SMARTR
SMARTR.Rmd0 Prior steps to get started
SMARTR stands for simple
multi-ensemble atlas
registration and statistical testing
in R. It is also a self-referential play on a previous
package developed as an extension to wholebrain called
SMART.SMARTR interfaces with some functions
from both of these packages underneath the hood.
SMARTR encapsulates the process of registration and
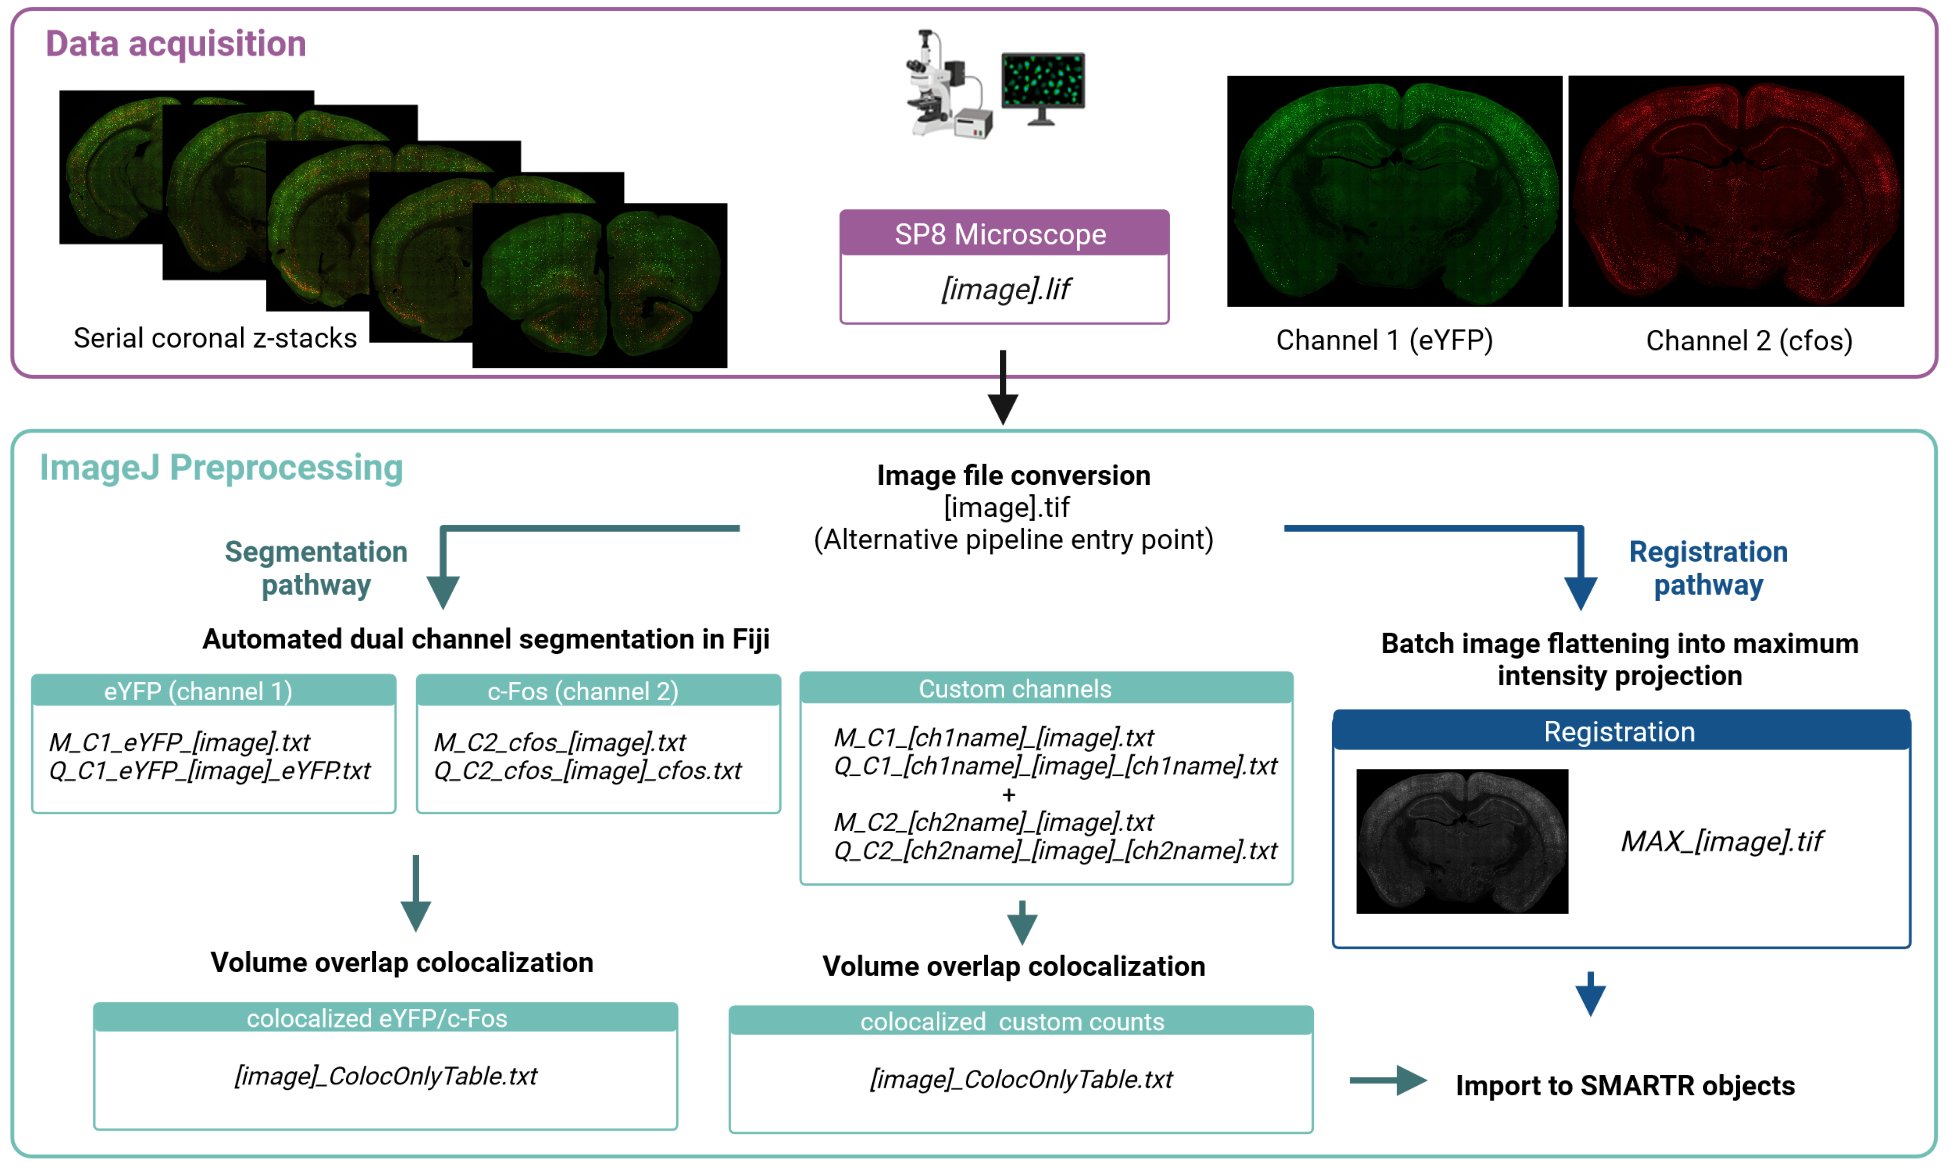
performs downstream analysis. Prior to this, the imaging data must be
pre-processed and cells are separately segmented in ImageJ/FIJI. We have
a separate, in-depth article on our imaging and pre-processing approach,
parameters, and segmentation process. We provide links to an example
image to run though the pre-processing and segmentation. There is also a
separate in-depth tutorial article for SMARTR using this example image.
This page provides installation instructions and a broad explanation of
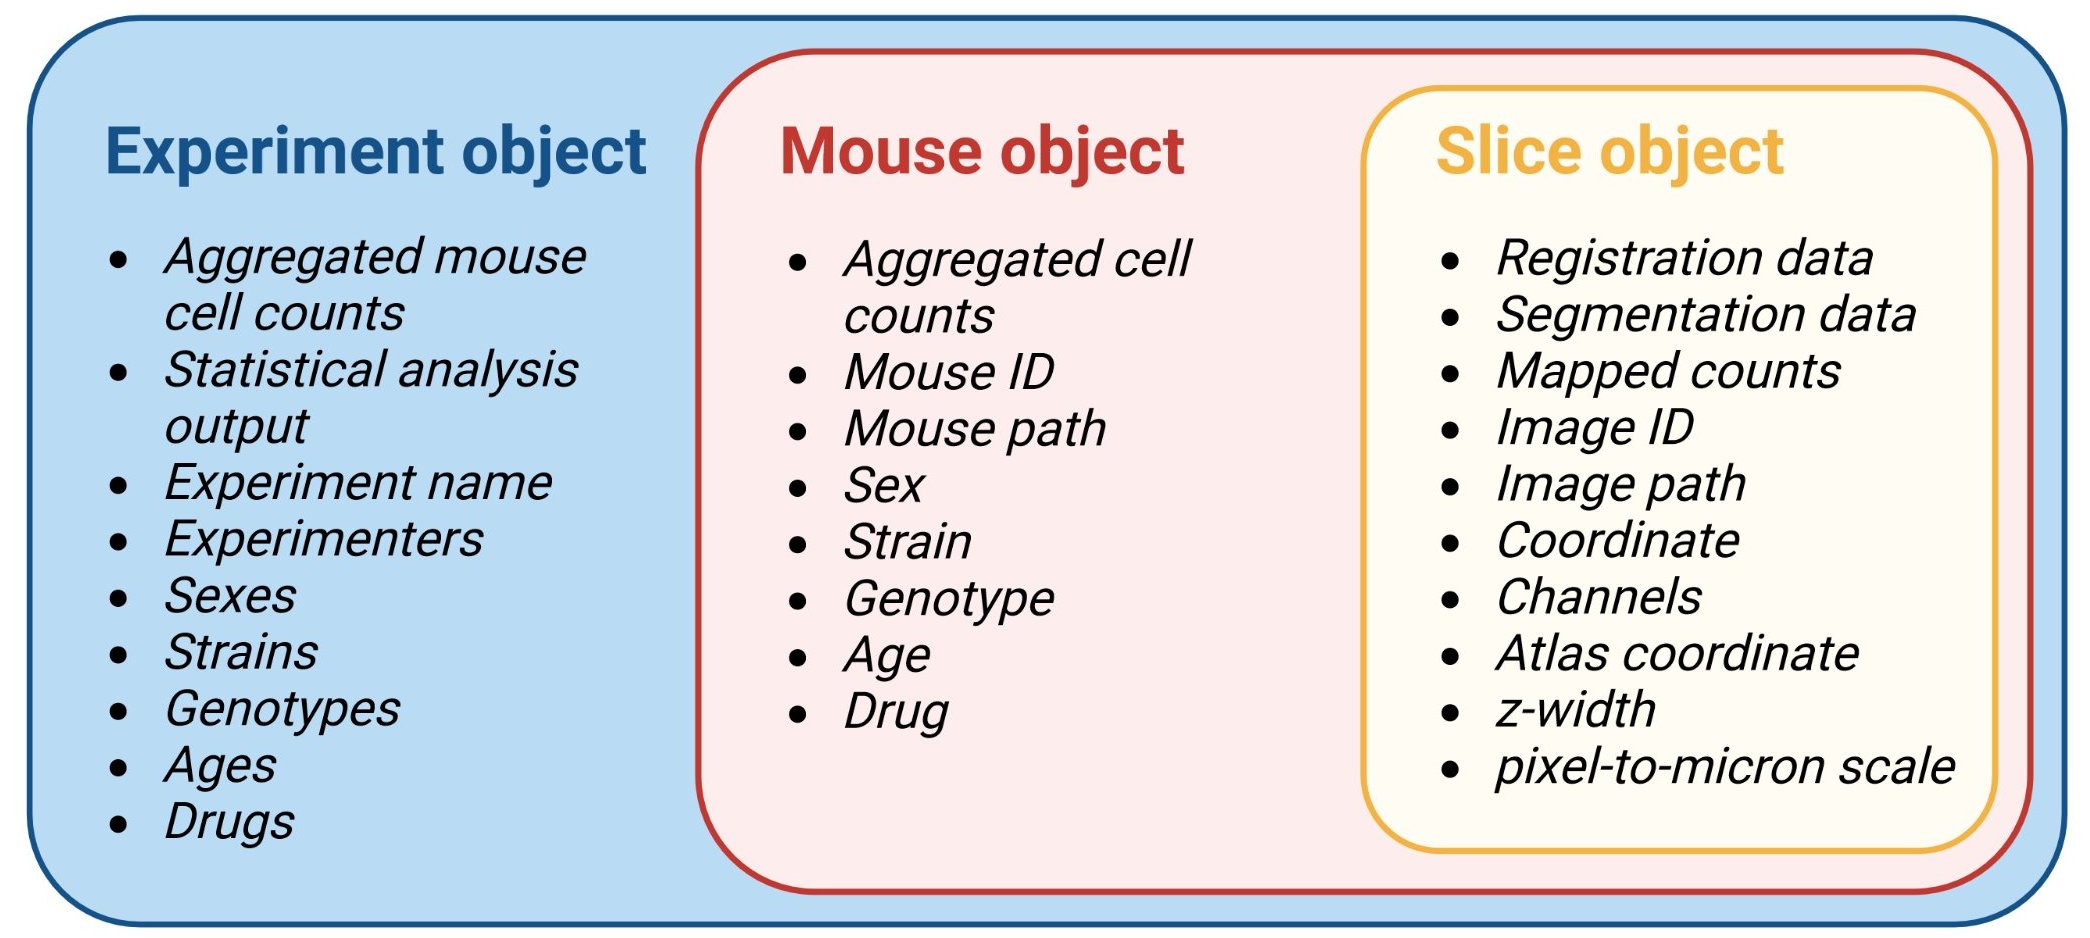
the central package organization around data objects

1 Installation for Windows
1.1 Install RStudio R
We recommend installing R version 3.6 for compatibility with
wholebrain for registration and mapping. You can download
it here
for Windows.
However, we will soon be releasing and supporting a separate version of SMARTR supporting R versions 4.1+ for users who only need access to analysis and visualization capabilities. Importation from other workflows would be supported on this version.
1.2 Install wholebrain
Installing wholebrain can be finicky. The most updated
instructions on installing wholebrain for Windows is found
here.
For Macs, the instructions can be found here. We strongly recommend using a
Windows setup, as this package has been used mostly in Windows.
If wholebrain is not installed, only the analysis and visualization functions may work.
1.3 Install Rtools
If you are using R 3.6+ on a Windows machine, you will need to
install Rtools version 3.5. Download it here
if you haven’t already installed it during the wholebrain
installation process.
1.4 Install SMARTR
To to download the package from github, we need to use the
install_github() function from the remotes
package. There are also a number of packages imports. Install the
package with the code below:
# Install remotes package
install.packages("remotes", contriburl = "https://cran-archive.r-project.org/bin/windows/contrib/3.6/")
library(remotes)

# Sometimes, the dependencies are not installed with the appropriate up-to-date version. Below, we install dplyr from source and specify the exact version for compatibility.
install_version("dplyr", version = "1.1.0", INSTALL_opts = "--no-multiarch");

# Install package dependencies. This may result in an error in the final step for installing SMARTR
remotes::install_github("mjin1812/SMARTR@main", contriburl = "https://cran-archive.r-project.org/bin/windows/contrib/3.6/",
                        dependencies = c("Depends", "Imports"), INSTALL_opts = "--no-multiarch")
You may run into something similar to the following error messages below:
Warning message:
package ‘C:/Users/[User]/AppData/Local/Temp/RtmpGo67wj/file261419dd3f94/SMARTR_1.0.1.tar.gz’ is not available (for R version 3.6.3)
If this is the case try the following steps:
# Install Hmisc. This is a package dependency but is sometimes skipped. Enter a space to skip any updates.
install.packages("Hmisc", contriburl = "https://cran-archive.r-project.org/bin/windows/contrib/3.6/")

# Try the following command again without the contriburl parameter to install SMARTR. Enter a space to skip any updates.
remotes::install_github("mjin1812/SMARTR@main", dependencies = c("Depends", "Imports"), INSTALL_opts = "--no-multiarch")
We can now load the package!
# Load SMARTR
library(SMARTR)

# You can pull up the package description with the code below:
?SMARTR
Tip: From now on, get in the habit of using the
?operator to pull up the help page about a package, object, function, or piece of data
1.5 Troubleshooting dependencies
If you are running into package dependency or version issues, you can
edit run the following code below to install the relevant packages
manually. Then rerun the remotes::install_github() command
from the section above.
# You can edit the following list of packages to install any ones which may missing. Enter a space to skip any updates.
install.packages(c("Hmisc", "gtable","dplyr", "readr", "readxl", "tidyselect", "tidyr", "ggplot2", "igraph", "tidygraph", "ggraph", "stringdist", "stringr", "grImport"), contriburl = "https://cran-archive.r-project.org/bin/windows/contrib/3.6/")

## Try uncommenting and using the commands below to install and compile certain individual packages from source if the above commands show problems.
# cp11_url <- "https://cran.r-project.org/src/contrib/Archive/cpp11/cpp11_0.5.0.tar.gz";install.packages(cp11_url, repos=NULL, type="source")
# install_version("tidyr", version = "1.1.3", INSTALL_opts = "--no-multiarch");
# install_version("dplyr", version = "1.1.0", INSTALL_opts = "--no-multiarch");
# install_version("readr", version = "2.0.1", INSTALL_opts = "--no-multiarch");
# install_version("readxl", version = "1.3.1", INSTALL_opts = "--no-multiarch");
# install_version("gtable", version = "0.3.5", INSTALL_opts = "--no-multiarch");
# install_version("ggplot2", version = "3.3.5", INSTALL_opts = "--no-multiarch");
# install_version("tidyselect", version = "1.1.1", INSTALL_opts = "--no-multiarch");
# install_version("igraph", version = "1.2.6", INSTALL_opts = "--no-multiarch");
# install_version("tidygraph", version = "1.2.0", INSTALL_opts = "--no-multiarch");
# install_version("ggraph", version = "2.1.0", INSTALL_opts = "--no-multiarch");
# install_version("stringdist", version = "0.9.7", INSTALL_opts = "--no-multiarch")
# install_version("Hmisc", version = "4.5.0", INSTALL_opts = "--no-multiarch");

## Optional: uncomment below to install ggpattern package (can be useful package for certain plotting options)
# remotes::install_github("coolbutuseless/ggpattern")3 Introduction to SMARTR
3.1 OOP in R
It’s helpful to get a sense of a how the structure of data is handled
and bundled together in this pipeline. Data is stored in S3 data type
objects called slice, mouse, and
experiment. The data in these objects will be manipulated
by a special type of function called a generic function (this is
analogous to an object method in python). Generic functions allow you to
pass objects of different classes to the same function, and it can
recognize and perform different operations on objects depending on their
class. If this is all confusing to you, don’t worry at all! This is much
more information than you actually need to know to use this pipeline.
It’s just helpful to better understand the architecture of the
package.
To get an excellent brief overview of what object oriented programming (OOP) is and it’s advantages over procedural programming, check out this excellent YouTube video!
3.2 Slice objects
A slice object will contain all the data related to
registration, segmentation for each channel, and cell counts for a
particular image.
It will also contain metadata about your images, such as what the
slice no. is, which brain atlas AP coordinate matches best
with the given image, and what the path to the image used for
registration is. These metadata are stored as the object’s
attributes.
Run the code below to used the ? operator to pull up the
documentation for a slice object. This will pull up a help
page description of all the slice object attributes.
?SMARTR::sliceTip: Usage of the
::or double colons here means that R specifically looks for a function, object, or help page inSMARTRpackage. This isn’t necessary if you load the package, but it can sometimes help avoid ambiguity if there are identical names for things in other loaded packages.
3.3 Mouse objects
A mouse object is an object that will store multiple
slice objects (and therefore all the information in it),
and will eventually store the combined cell data and the region cell
counts normalized by volume. Like a slice, it will also
contain “metadata” about your mouse stored as string attributes. Now,
try pulling up the help page yourself for the mouse object
to see all attributes you can store!
3.4 Experiment object
An experiment object will primarily store the processed information
from multiple mouse objects. Some experimental attributes
will autopopulate based on mouse attributes. For example, if multiple
mice are added to an experiment with the drug attribute
values ketamine or saline, the experiment
attribute drug_groups will be a vector with the values
ketamine and saline.
